A guide to getting started with Google Tag Manager

Google Tag Manager (GTM) is not just for developers or those from a technical background so, if you want to know how you can use it to take your analytics tracking and reporting to the next level, then read on.
One of the difficulties of maintaining tracking code and adding new tags to a website is relying on a developer to change the code. When you factor in all the other priorities your development team may have, tracking becomes just another job in their queue.
Tag Management Systems empower marketers to be able to add new tags without requiring code changes onsite. Google Tag Manager is one of these systems: a freely available application provided by Google.
It may sound scary to developers to give marketers this ability, but Google Tag Manager has a variety of safety mechanisms to put the developer’s mind at ease! These include:
- A simple version system to track what has been done on your container
- The ability to rollback to previous versions
- Automated checks on any Javascript code, which blocks syntax errors from being published
- Debug mode where you can preview and test any tracking changes on the site
We have split the guide into three parts
Part one: Using the GTM user interface
Google Tag Manager structure
Google Tag Manager has a hierarchical structure:
- Account
- Container
An account can have more than one container. You can also add/modify user permissions at both levels: you can give a user container access but not account access. It is best practice to only give the owner of the account full account-level access.
Q. How can I add a new user to a GTM container?
Go to Admin → User Management → New
An email address is used to identify the user.
Account and container setup
Google recommends that each company has its own account. Within that account you can have multiple containers for each of the company’s websites or mobile apps. You can also add users to your accounts and containers with different levels of access:
- View only
- View and Edit
- View, Edit, Delete, and Publish
For your first container, name it after the website or app you are going to use it on. For example “www.freshegg.co.uk”.
After accepting the terms and conditions, you are provided with your container code. This must be placed on every page on your site that you wish to add tracking tags, too. It should be placed immediately after the opening tag.
If you don’t do this immediately, you can find the container code again, here:
Admin → Install Google Tag Manager
Container structure
The container is where you manage the tracking being added to your site through the container code snippet provided by Google.
Tags: Tags contain the tracking code that is added to your website. Google provides some templated tags for Google Analytics and other 3rd party tracking providers. You can also create custom HTML tags to suit your tracking requirements.
Triggers (used to be called rules): Triggers control when a tag should be fired: on certain pages or upon certain user interactions. These are called rules in the old interface. One tag can have more than one trigger: the tag will fire if any of the triggers’ conditions are met.
Variables (used to be called macros): Variables store information about the page of your website and the element on it. You can reuse variables across any number of rules and tags. Google has predefined variables and you can set up your own.
Built-In Variables
The interface provides an efficient method for using the built-in variables provided by Google. When you go to the variables page it will display the available built-in variables. Some are ticked by default. You can tick the ones you require to make them available to use at any time.
Top 3 built-In variables:
- Page URL - This captures the page a visitor is currently on when a pageview or event is fired; this is used to trigger tags only on certain areas of the site
- Event - The name of the event that was fired. This is used to set up triggers when a certain event is fired
- Click URL - The destination URL of the clicked link
Setting up your first variable
If you are looking to implement Google Analytics through Google Tag Manager then the first variable that you will find useful to set up is one for your tracking ID. Follow the steps below to do this:
- Click the red ‘New’ button, at the bottom of the page in the variable section of the container
- Select ‘Constant’
- Give the Variable a useful name, e.g. ‘UA Tracking ID’ – by default, it is set to Constant
- For the value, Paste your tracking id from your Google Analytics property (UA-XXXXXXXX-X)
- Create variable
![]()
You will reference your UA Tracking ID when setting up Universal Analytics page views and events. If it changes or you want to clone your container to use for another website, you only have to change it in one place.
Setting up Universal Analytics Pageview tracking
The next step to proceed with is setting up a Universal Analytics tag for firing pageview tracking to Google Analytics.
Go to Tags → New
Select the following options at each stage in the process.
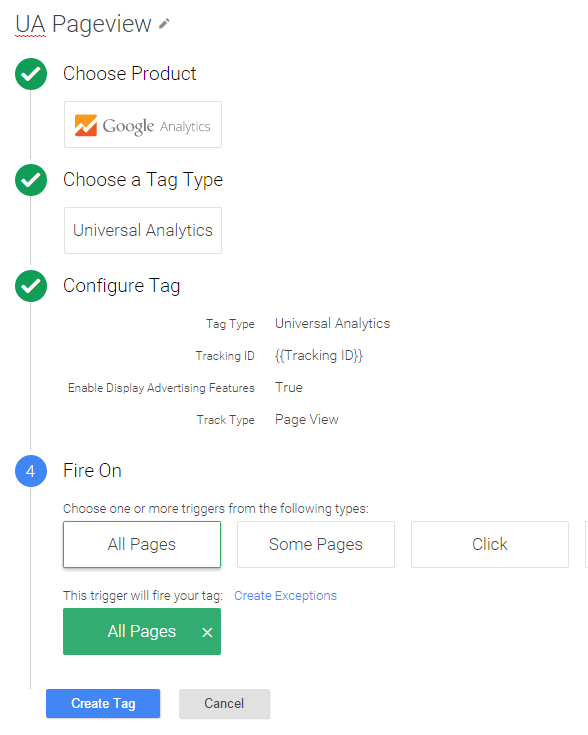 Triggers are integrated into the setup of a tag. If your tag has no trigger it will not fire. When using a Variable in a field, you’ll notice it appears with the syntax {{Variable Name}}. The curly brackets are the syntax that tells Google Tag Manager this is a variable so don’t remove these from a variable. Your tag is now set up, but you need to ensure you test it before publishing.
Preview and debug mode – testing your changes
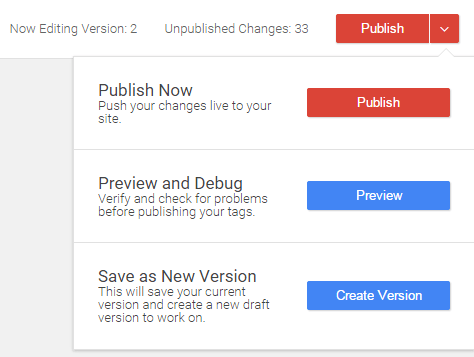
The preview option can be selected from the publish menu at the top right of your container. When you select the preview option, you will see a debug area appear on the website the container is on. Open a new tab for your website and you’ll see a window at the bottom of the page, like the example screenshot:
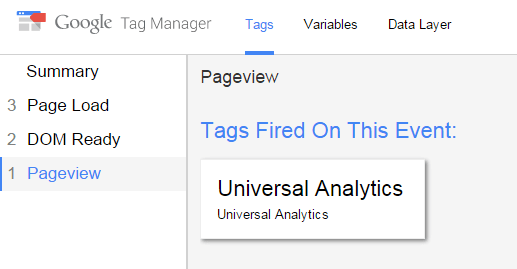
The debug area will only appear in the same browser you are using Google Tag Manager in. In summary, whenever an event is received by Google Tag Manager, it will show in the summary. You can click each of these to see which tags fired. We are expecting the tag we set up to fire at ‘Pageview’.
You will see your tag in the ‘Tags Fired On This Event” list if you’ve set this up correctly. There is always a list beneath the tags that didn’t fire.
Q. What is the most common reason a tag doesn’t fire? How can I work it out?
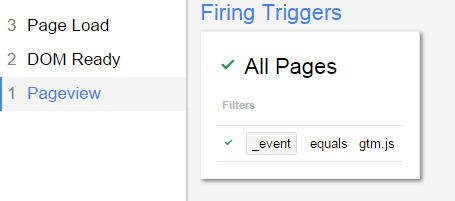
The most common reason for a tag not firing is that it doesn’t meet its trigger conditions. To find out whether your tag met your trigger conditions, click on it in the list in the debug window.
Scroll until you see “Firing Triggers”. There will be a green tick if the trigger was met and a red cross if it isn’t.
Q. I’m having an issue in debug mode I can’t work out, how can I get help?”
You can opt to share a preview of your version with other people so they can help. To do this, you go to the versions section and select “Share Preview” from the actions menu.
Note: You can’t share a version that you are currently editing. You need to create a new “Now editing” version from the publish menu on the container page then share the previous version with your changes in.
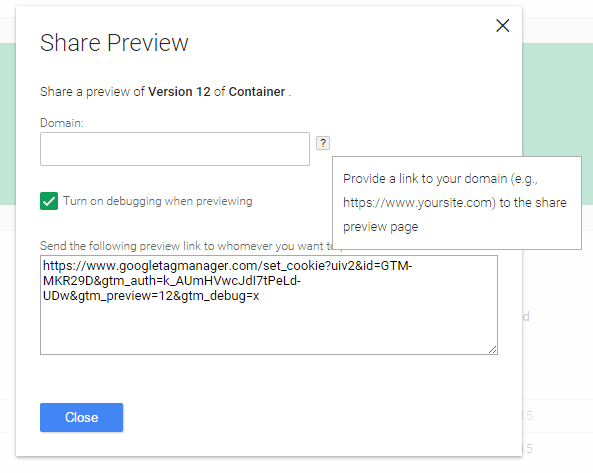
You will need to provide the domain you are testing; using the link will allow a preview to be seen in different browsers and different computers.
Versions and publishing
Versions are drafts of your container. Versioning systems are often seen on Content Management Systems: The main function of a versioning system is to ensure you can always roll back to a working version if you accidentally publish something broken.
- You can create a new version to start editing anytime from within your container by using the top right publish menu in your container. It’s the third option the menu
- The publishing action is in red, this is a colourful reminder that you should be careful when publishing any container changes
Checks to run before you publish
- Has there been recent activity from other users, or yourself that you weren’t expecting? You can check this in the recent activity log in the container overview. You want to ensure that you don’t publish changes that aren’t ready.
- Have you previewed everything you did?
💡 Top tip: You can remove the triggers from any “work in progress” tags you have; they won’t fire and your triggers will still be saved to reattach in a later version
Once you’re happy you can click that red publish button for your changes to be live on your website.
Checks to run after you publish
- Ensure your version is named so it gives a brief indication of what you did. You can rename your container by switching to the Versions tab and selecting the rename from the actions dropdown
- Check it is working as expected on your website
Q. How do I republish a previous version?
Switch to the versions tab and select publish in the actions column of the version.
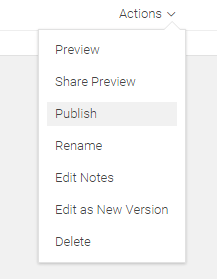
There is also an option to create a new draft version with the contents of the old version.
Limitations and caveats
- You may still need to make code changes on your site if the current HTML structure can’t be used to set up your event. For example, if there are no specific classes/ids on the element you want to track, it can be difficult to target it
- Beware of changes to your website structure. During website updates, page structures and page URLs can change. If your event triggers rely on these, then it is important to set up clear communication guidelines with your website team so you can recheck your events after structural updates
- When setting up advanced tracking through Google Tag Manager, being able to access a developer’s knowledge about regular expression handling regularly can be difficult but invaluable when setting advanced triggers
Do you need help with Google Tag Manager implementation?
Part two: Event tracking in the new user interface
We will now focus on how you can set up events that are determined by clicking a specific link or element on the page.
We will walk through setting up tags to track the following actions:
- Identify HTML Element Attributes, their values and GTM Variables
- Testing and debugging event tags
- Tracking outbound links
- Tracking PDF views
- Tracking phone calls from mobile
- Tracking clicks on email addresses
- Tracking clicks on buttons
But first let’s understand how we are going to identify these clicks and how to test any changes made in GTM before publishing.
Identify HTML element attributes, their values and GTM Variables
It is useful to have a basic knowledge of HTML when setting up advanced tracking. I will be highlighting how to identify what attributes your GTM variables come from but if you want to read more on HTML, and practice understanding, I would recommend Codecademy’s free and interactive lessons on HTML fundamentals.
Individual elements on the page, such as buttons or forms, can have various attributes, which are in the form of key=”value” pairs. You can identify what attributes a specific button has by locating the HTML when you right-click and view page source.
The list below explains how to identify the commonly used ‘built-in variables’ used in GTM:
Click Classes – This refers to the active classes on the clicked element. This looks like the following in HTML:
<button class=”fruit apple”>Test</button>
In the above example, the HTML element has both a class of fruit and a class of apple.
Click ID – This refers to the ID attribute of the clicked element.
E.g. <button id=”grape”>Test</button>
In the example above, the HTML element has an id of ‘grape’. The ID of an HTML element should be unique on any singular page of your website. For this reason, it is often used for specific click tracking.
Click URL – This refers to the href attribute or action attribute of the clicked element.
E.g. <a href=”test.html”>Cherry</a>
Click Text – This is filled with the inner text contained within the clicked HTML element.
E.g. <a href=”test.html”>Pineapple</a>
Pineapple would be the Click Text value if this element was clicked.
Testing and debugging event tags
You should test any change you make in GTM, even if you feel like you’ve done it enough times, always test. We’re all human and so we make mistakes, which is why there is a versioning system in Google Tag Manager.
In the part one of this tutorial we covered the testing of a simple pageview tag. But there are a few more steps to make when testing an event tag because they generally have more complex triggers.
Step 1 – Enter Preview Mode
The publish menu is located in the top right of the page. This allows you to test tags before publishing them. You can select preview and debug mode at any time. When you are in preview mode, you’ll be able to see the debug window on your website; you need to view it in the same browser.

Step 2 – The desired result test
Click the element or link that you are expecting your new event to occur/fire on. The example below is for tracking ‘Mailto:’ links and will fire on a ‘gtm.linkClick’ event and when the trigger conditions are met.
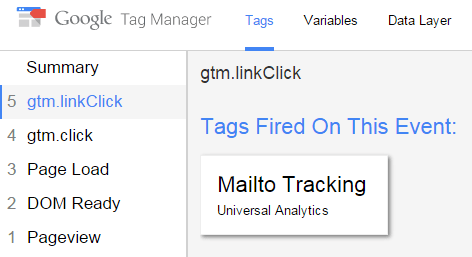
In the summary, an event called ‘gtm.linkClick’ will fire when a link is clicked. Select this in the summary and you’ll see the Mailto Tracking tag.
Troubleshooting
The most common reason for a tag not firing is that the trigger conditions are not working as expected.
Select your tag, it will be in the ‘Tags Fired on This Event’ list or the ‘Tags Not Fired on This Event’. There will be a green tick under firing triggers if the conditions were met and a red cross if they weren’t.
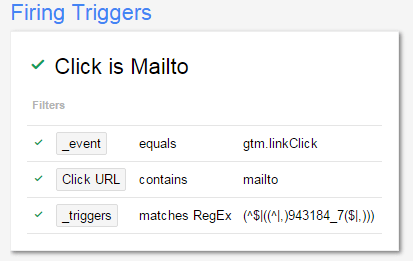
Check values
To check that the event parameters are set up with the values you expect, select your tag from the gtm.linkClick Summary.
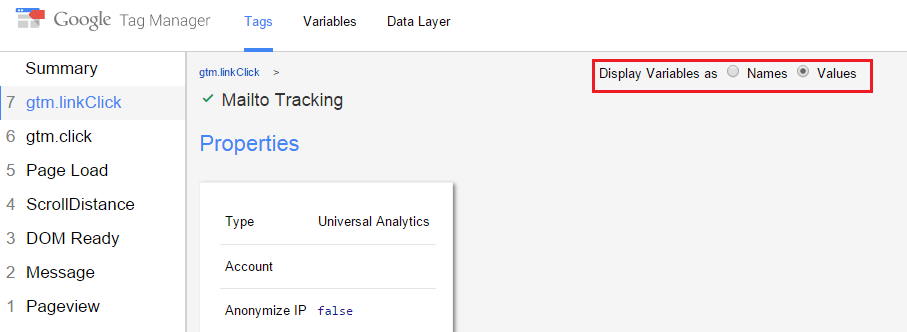
Select the option ‘Display Variables as Values’ and the properties will display as the values contained in the variables, rather than the names of them. You can then view the ‘Event Action’, ‘Event Category’ and ‘Event Label’ values under the ‘Properties’ heading.
Step 3 – The undesired result test
You should also check that your new tag doesn’t fire when it isn’t supposed to. Click a link on the page that you don’t want to track. In the Mailto example, you would click a non-email link.
Check that your tag doesn’t fire in the new gtm.linkClick event. If it does, then your trigger conditions may not be specific enough.
The GTM community is an excellent place to share any issues you are having with your tag setup; you can expect fast and expert support there.
Tracking PDF views
This is a common requirement; you’ve invested time in creating PDF documents with great content, so you want to know if visitors download them and which ones are popular.
Step 1 – Check Variables
Ensure the ‘Click Url’ built-in variable is selected
Step 2 – Set up trigger
Set up your trigger with the following settings:
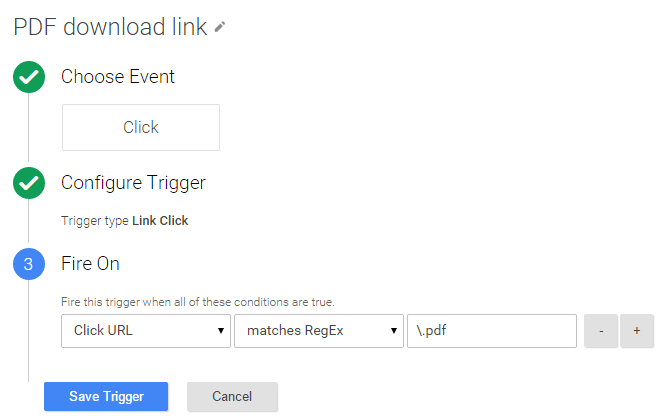
The regular expression in this example is checking that the clicked link contains ’.pdf’. The regular expression ‘\.pdf$’ would also work but could potentially exclude URLs that contain characters following the ‘.pdf’ such as query string.
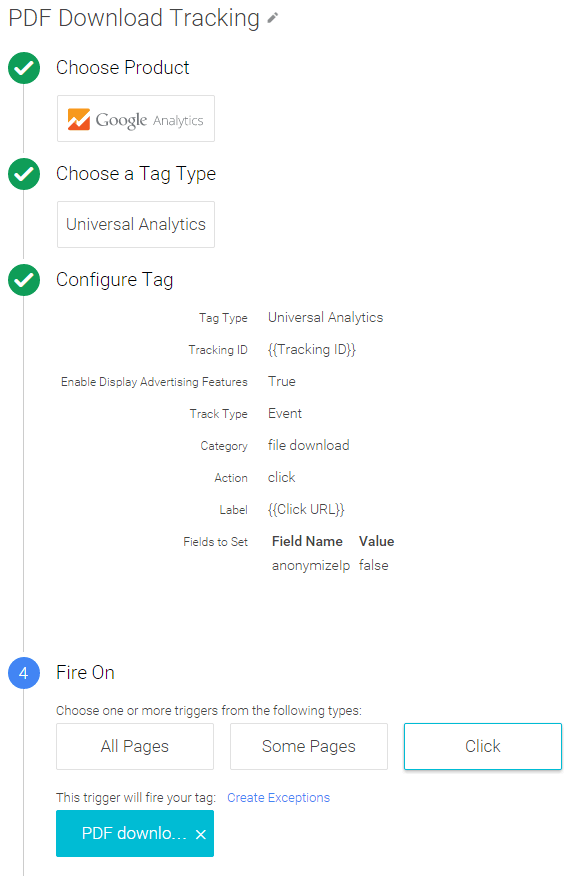
Step 3 – Setting up tag
Create a new tag with the following settings: select the trigger you just created and use the ‘{{Click URL}}’ variable in the label so you can differentiate specific PDFs in your reports.
Tracking outbound links
Q. Why set up outbound link tracking in Google Tag Manager?
Analysing where users exit your site and where they are heading is often a key element of reporting. You may have various outbound links on one page, it is useful to know where they are going before deciding that page is performing badly. For example, if they’re going to your Facebook page that may be a desired departure. Or it may be that you want to rethink the placement of your external link.
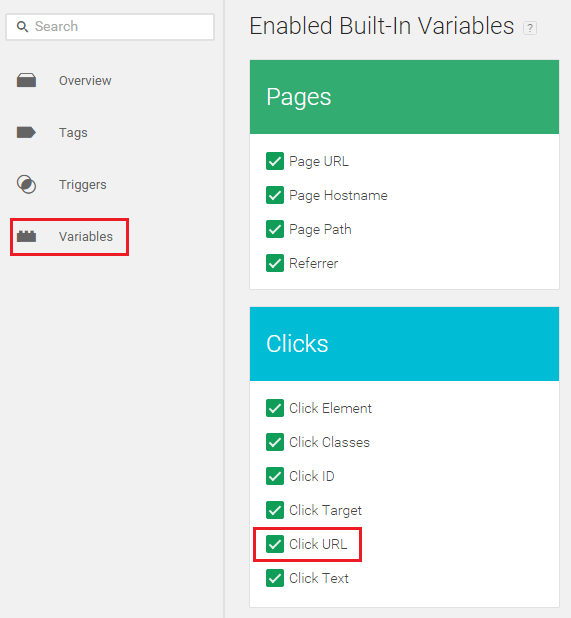
Step 1 – Check Variables
Ensure the built-in variable ‘Click URL’ is selected:
Step 2 – Set up trigger
Create a new trigger with the following settings:
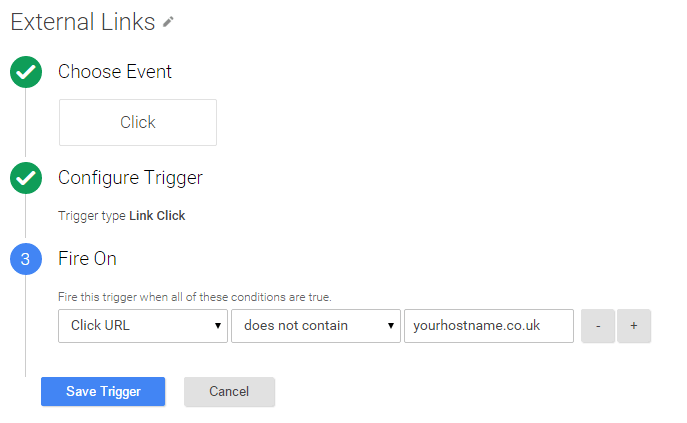
Replace ‘yourhostname.co.uk’ with your website domain.
Step 3 - Set up tag
Set up a Universal Analytics Event Tag, selecting the trigger you set up to control when your tag will fire and use the ‘{{Click URL}}’ variable as your event label to differentiate the links. Your tag should have the following settings:
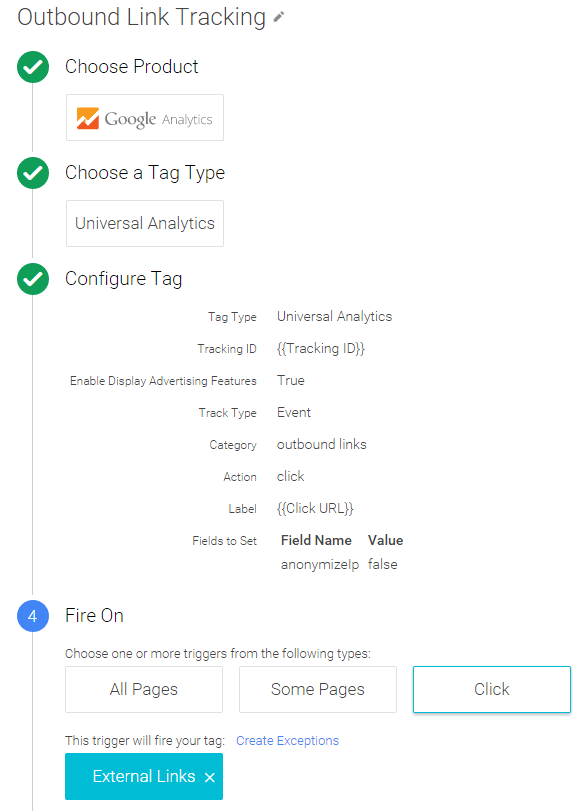
In the configure trigger setup you also have the"Wait for Tags" and "Check Validation" options, (which I've left unticked in the example above):
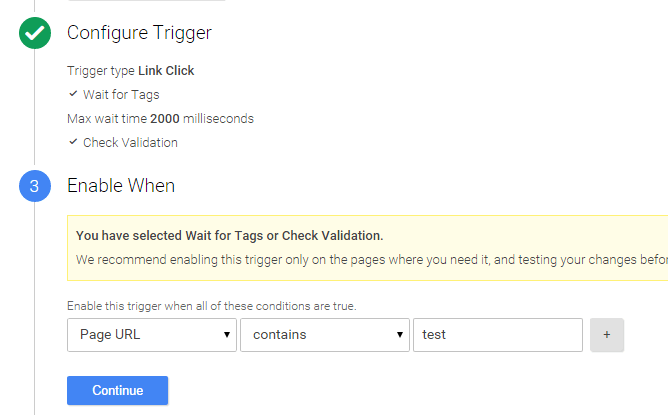
- Wait for tags will delay the link from opening until all tags have fired or the specified time (in milliseconds) has elapsed.
- Check validation will ascertain whether any other code on the page prevented the default action from occurring, this is used for setting up form tracking.
- If either of these boxes is ticked, the "Enable When" section will appear, where you will need to specify the page(s) where your trigger will be active
- I usually use these options when I'm setting specific tracking on a unique button or form
Tracking calls from mobile
Phone numbers displayed on a mobile device can be made instantly dialable with a click when you use the following syntax:
<a href=”tel:1111111111”>111111</a>
It is possible to set up a tracking tag to check for this syntax in GTM.
Step 1: Check Variables
Check the variable ‘{{Click URL}}’ is ticked.
Step 2: Set up trigger
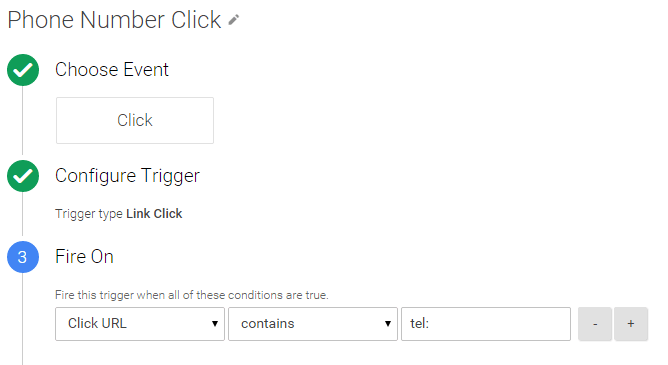
Step 3: Set up tag
Select the trigger you set up previously and use the ‘{{Click URL}}’ variable as the event label. This will capture the specific phone number that was called – especially useful when you may have different numbers for departments.
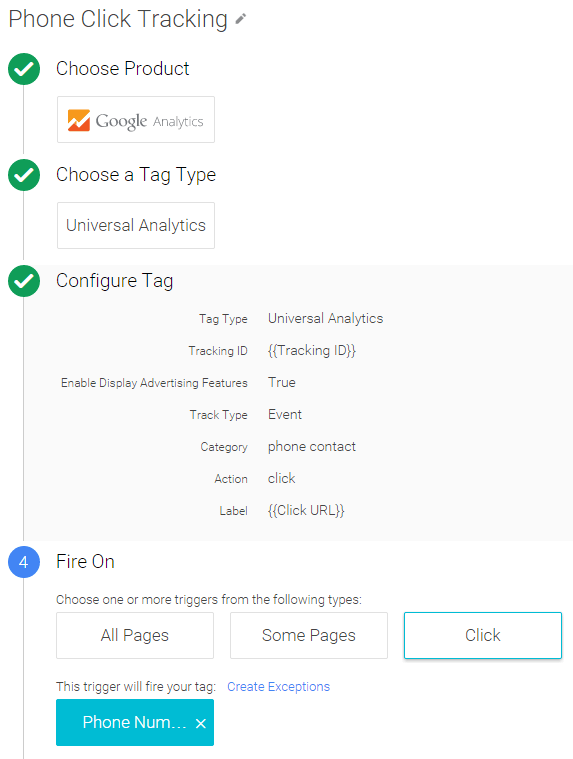
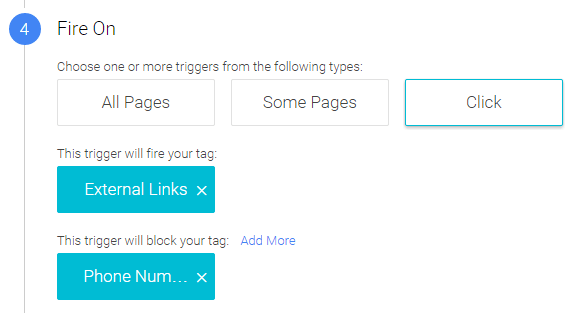
Step 4: Set up blocking trigger
Phone number links won’t contain the hostname of your site, so they may be captured by an outbound link-tracking tag if you have set one up. You don’t want to capture the same data twice so you would want to use your phone trigger as a blocker on your outbound link tracking tag.
Tracking clicks on email addresses
Step 1: Check variables
Check the variable ‘{{Click URL}}’ is ticked.
Step 2: Set up trigger
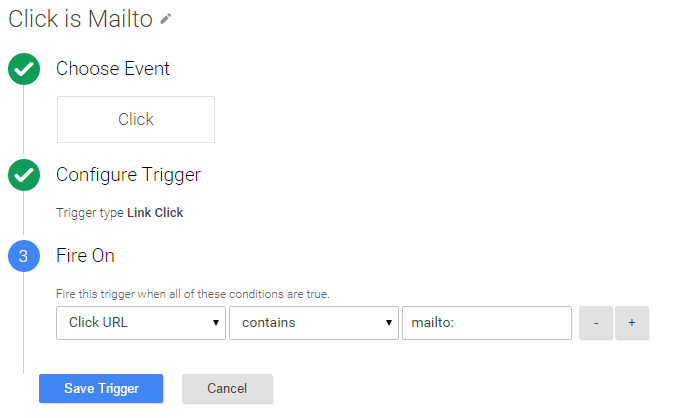
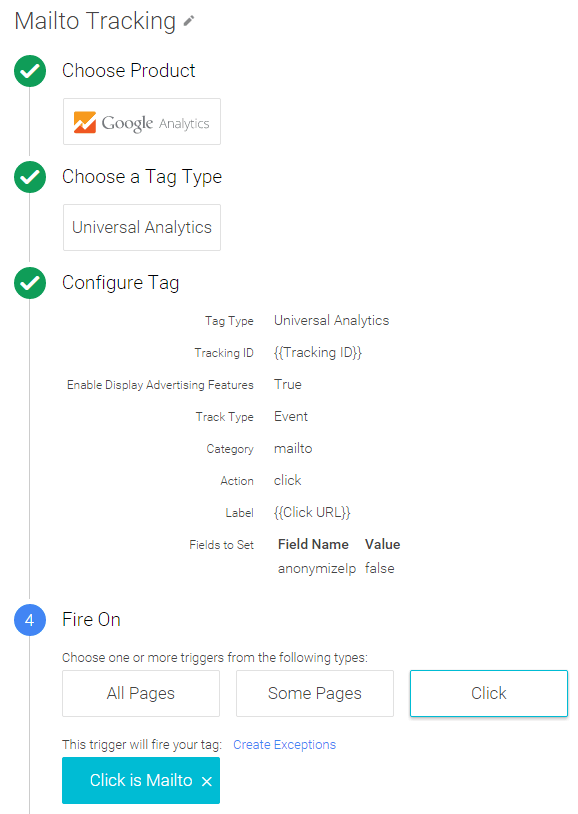
Step 3 – Set up tag
Create a new tag with the following settings: use the trigger you just set up and the ‘{{Click URL}}’ as the label. This is so you can differentiate email clicks in your data without having to set up multiple tags.
Step 4 – Add blocking trigger to outbound link tag
Email links may not contain the hostname of your site, so they may be captured by an outbound link tracking tag if you have set one up. You don’t want to capture the same data twice so you would want to use your Mailto link trigger as a blocker on your outbound link tracking tag.
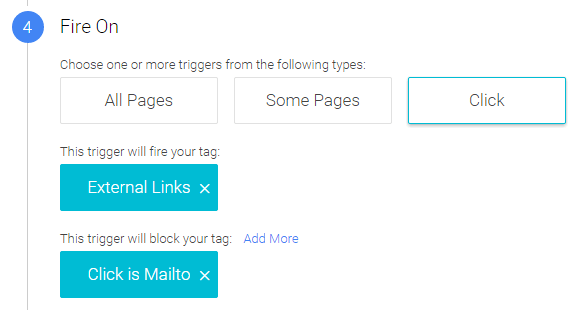
Blocking triggers always take precedence. Your outbound link tag will fire for all outgoing links apart from ‘Mailto:’ clicks.
Tracking clicks on buttons
A regular requirement is to track how many clicks there are on a specific button or call to action (CTA).
Q. What is the purpose of my specific click tracking in Google Tag Manager?
It may be that you have the same CTA at a different place on the page and from a user experience perspective you will want to know which one is working most effectively. It is important to identify a specific purpose for why you track something, instead of tracking everything. Setting up a measurement plan should be a key step for your business.
Step 1 - Variable setup
You need to know how you are going to identify your button(s). This is often via an attribute of the HTML element and there are built-in variables that refer to these, as explained in the HTML attribute section.
For the purposes of this example I will use the Click ID variable.
Step 2 – Set up trigger
Use the Click ID variable and replace ‘example’ with the ID of your element.
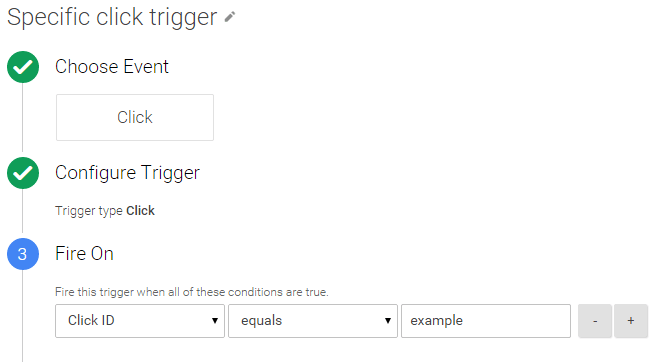
Step 3 - Set up tag
Set up a tag with the following settings, replacing the event category in the example. I haven’t used an event label in this setup. While setting an event category and action is mandatory, event labels are optional.
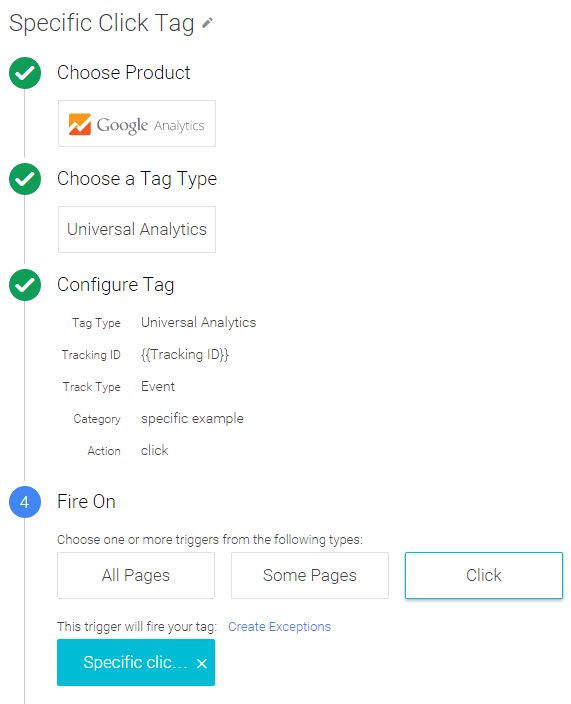
Remember to refer to the testing and debugging GTM section before publishing your tag.
Do you need help with Google Tag Manager implementation?
Part three: Form tracking in the Google Tag Manager interface
Form tracking can be challenging - if you don’t have a technical background the debugging part can seem daunting. This post attempts to provide you with the means to carry out simple debugging of common issues encountered when setting up form events, and also provide an alternative dataLayer approach when the GTM form events aren’t compatible.
We will walk through the following:
Tracking successful form submissions
Step 1 – Check required built-in variables are enabled
We’re going to be using the following built-in variables to set up form tracking in this example:
- Form ID
- Page URL
Step 2 – Set up trigger using the Form ID and Page URL variables 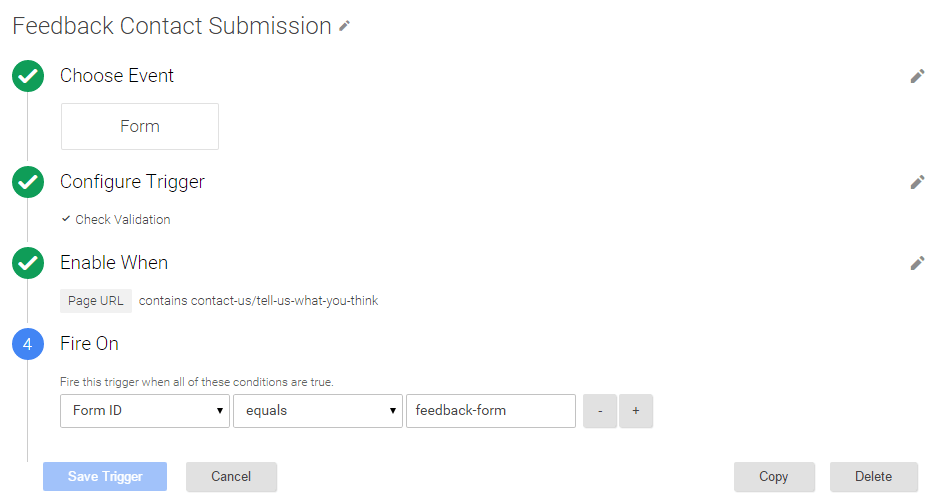
- Configure the trigger to ‘Check Validation’
- Enable the trigger to check form submissions only on the age(s) where your form is located
- Add a filter, which uses the ‘Form ID’ variable
- Note: If the form is the only one on that page, you can just select the ‘All Forms’ box on Step 4; be certain it’s the only one though!
Q. How do I identify my Form ID in GTM?
You can use the HTML structure to identify whether your form has an attribute you can use to identify it. The following video shows you how to locate this:
- Right click and select ‘Inspect Element’ on your form
- Locate the code that begins <form
- The value in the id=”” attribute will be what is captured by the ‘Form ID’ variable
Help! My form element doesn’t have an ID on it!
In some cases a form won’t have an ID; you may be able to use a class that is specific to that form or ask your development team to add an ID to the form HTML element. One of the limitations mentioned in the event tracking guide is you do rely on the current HTML structure being usable through GTM.
Step 3 – Create Universal Analytics event tag
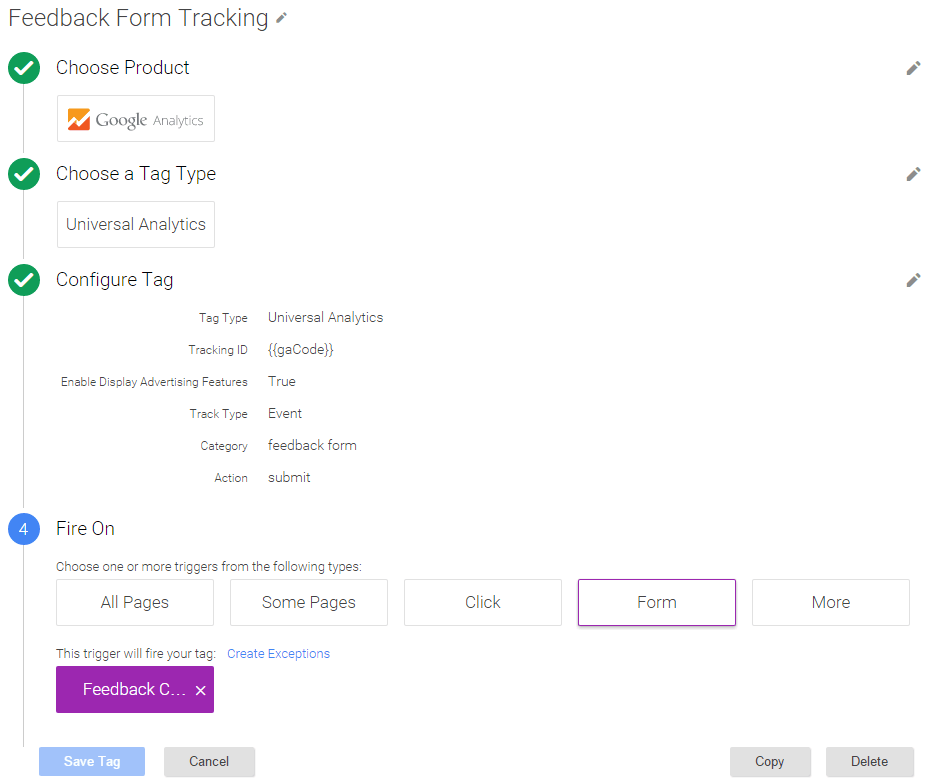
- Select a track type of ‘Event’
- Fill in your ‘Category’ and ‘Action’ values
- Select the form trigger you set up earlier
Tip: The types of triggers are colour-coded in the latest interface; form triggers are purple.
Step 4 – Testing the tag
If you’ve followed part one and part two, you’ll be familiar with the preview mode and testing. I’m going to take a slightly different approach for testing form events; I’ll be using a free plugin to help identify the newly setup tracking.
It can be difficult to test form tracking with the traditional preview mode of GTM due to there not being a way to preserve a log of previous page events; often form submissions cause a page refresh. I use the free WASP Inspector Plugin that can be added to Chrome to see the flow of tracking as you move through a website.
Note: Don’t forget to enter preview mode in through Google Tag Manager so you can see your new tracking.
To check your form event is firing take the following steps:
- Open the WASP tab in the developer console, with the shortcut Ctrl+Shift+I
- Submit your form
- Return to the page tab the form was submitted on, and identify the collect call (or UTM if you’re using Classic GA, P.S.: You should upgrade your analytics!)
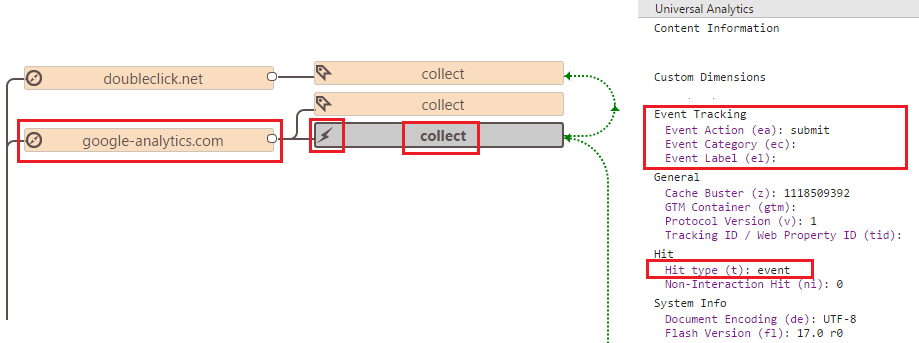
- Identify the calls to google-analytics.com
- For Universal Analytics these will be called ‘collect’ and there will be a lightning symbol next to events, click the collect call for the details of your event
- Check the hit type and your event details; I’ve blocked out some information from displaying in my screenshot for data-sensitive reasons
You should check the following are positive when setting up a new event:
- Is the ’Tracking Id/Web property ID’ correct? (in the ‘General Section’)
- Is the event only being fired once?
- Are the pageview and any other events on that page still working?
- Is the event firing only if the form is validated?
If you couldn’t locate your event call then check the common issues listed below to try to fix your event.
Common Issues with form tracking
1) Is the ‘‘gtm.formSubmit’’ event in the dataLayer?

On the page where you submitted the form, if you don’t see the ‘‘gtm.formSubmit’’ event being fired into the dataLayer then GTM is having problems identifying a form submission. Read more about the cause of this in this section.
When you see the ‘‘gtm.formSubmit’’ event but not your GA event, this is usually because your tag didn’t meet its trigger conditions.
When you select the dataLayer item, you’ll see the values of the element that triggered the event:
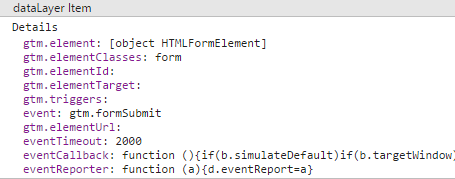
If you’ve used the ‘Form ID’ variable, you’ll want to check that ‘gtm.elementId’ is the same as what your ‘Form ID’ trigger condition is set to.
Double check every aspect of your trigger conditions:
- Is the page correct?
- Are the ‘Fire On ‘conditions correct?
- If you de-select ’Check Validation’ does the form event fire?
GTM and form submission problems
This can be a tricky problem to understand if you don’t have any coding experience - I’ve tried to break it down into small parts that are easy to digest.
In this explanation we will talk about the DOM; which is simply the structure of HTML elements on your page.
Q. How does GTM’s form submit listener work?
GTM’s form submit listener is built to detect forms firing a submit event, it then pushes the ‘gtm.formSubmit’ event to the dataLayer.
If this doesn’t work when your form is submitted, it is generally because other code on the page is also ‘listening’ for the form event and is firing code that prevents GTM’s listener from working.
Q. Why does this occur?
When an event occurs on a page, like a form submission, it moves up the elements of the DOM, allowing any listeners attached to each element to fire.
GTM listeners sit at the top of the DOM tree, they are the last to be reached and code that is listening on elements further down the tree can interrupt the flow of events by using bad practices in the code that stops event propagation.
Using a dataLayer event for form submissions
If you don’t have a technical background it can be difficult to provide the detail to justify to developers you need code changes that fix event propagation. Changing how form code is working may not even be a feasible option if there is limited development time available for your tracking requirements.
If you’re unfamiliar with JavaScript, this can also be a solution for retrieving specific form values without setting up custom variables in GTM using JavaScript code.
Step 1 – Instructions for developers
Ensure the instructions are specific - provide a link to the page the form is on. Here are some example instructions:
*******************
** On XXXX Page
** When X Form is successfully submitted
** Where {OPTION_VALUE} is the value in the select drop down “Name of drop down”
** Fire the following JavaScript code
***********************
<script>
dataLayer.push({'event':'formA', 'formOption':'{OPTION_VALUE}'});
</script>
Note: Ensure you have declared the dataLayer before the GTM container and make sure to only ever use the push method to add key-value pairs to the dataLayer.
You can replace formA and {OPTION_VALUE} with more meaningful names.
Step 2 – Set up dataLayer variables
You need to ensure any dataLayer values you want to use in the GTM interface are set up as a Data layer variable, I’ve used the ‘formOption’ as an example below:

You can then reference the variable in your tag and trigger settings.
Step 3 – Set up trigger
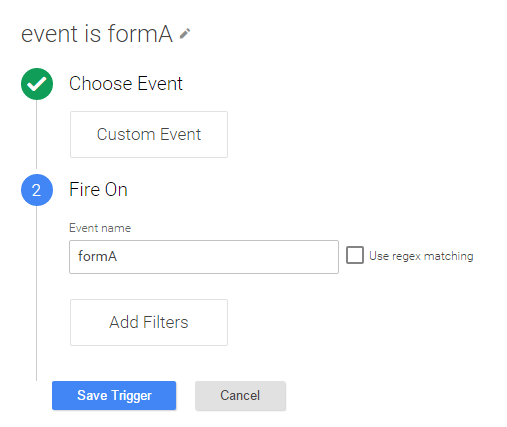
- Select ‘Custom Event’
- Use the ‘Event name’ firing into the dataLayer
Step 4 - Set up tag
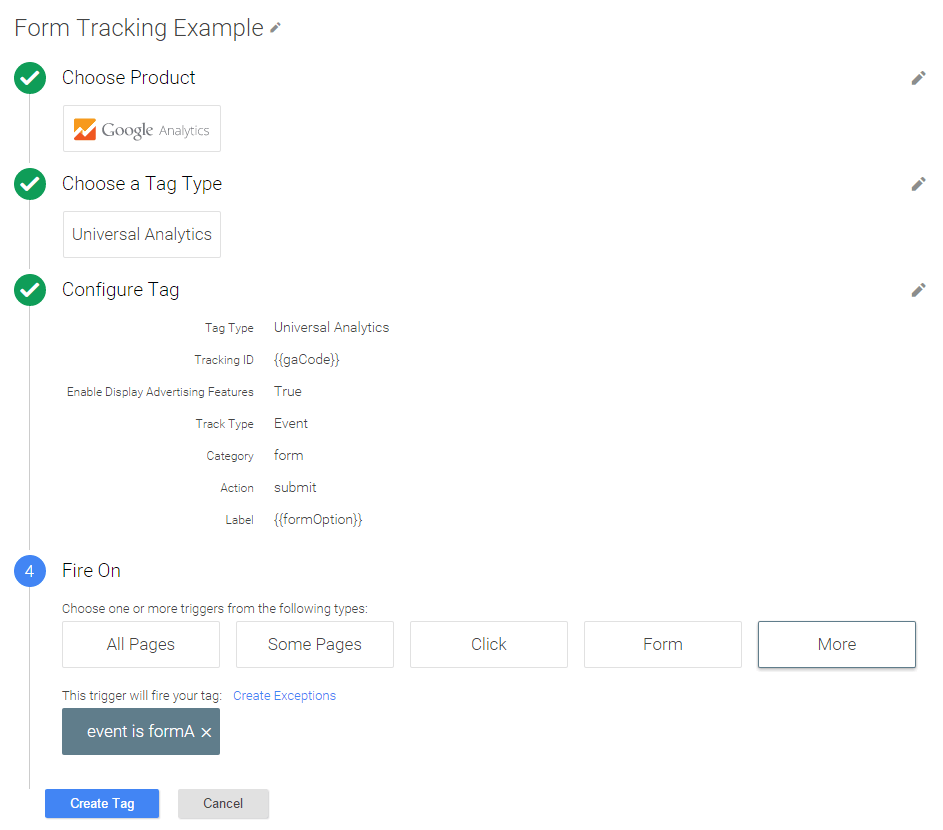
- Use a tag type of event
- Use the {{formOption}} variable as the event Label to send this data to GA
- Select the trigger set up in step 4
Conclusion
Form tracking can be more challenging to setup, and trickier to debug. We hope the walkthrough and common problems in this post has helped you set up your own form tracking. Let us know in the comments if you are having trouble with your setup.
Do you need help with Google Tag Manager implementation?
Further reading
Do you have a challenge we can help with?
Let's have a chat about it! Call us on 01903 337 580