How to set up eCommerce tracking in Universal Analytics
If your business sells products online, reporting product purchases using a web analytics tool such as Google Analytics (GA) is essential to understanding and measuring performance. Keep reading as we explain how to set up ecommerce tracking for your online store correctly.

With our help, your business can understand the outcome of your marketing campaigns by linking them with purchases and subsequently tracking the return on investment (ROI).
If you can analyse your user behaviour and your marketing performance, you will be able to optimise the user experience and ultimately increase business revenue.
This information will walk you through:
1. How does ecommerce tracking work in Universal Analytics?
E-commerce tracking in Universal Analytics (UA) requires extra code and implementation on top of the normal page view tracking.
Standard eCommerce tracking is very similar to the outdated classic Google Analytics e-commerce tracking. An extra snippet of code on the transaction confirmation page sends details of the purchase to Google Analytics.
Development work is necessary to complete the setup because the data requires special formatting on the server side.
Here’s a simple explanation of how eCommerce tracking works:

This is simplified because users can make transactions through third parties, like PayPal.
Head to this post's common e-commerce tracking problems and solutions section to learn how to fix payment provider referral problems.

How to conduct a Google Analytics health check
Download your FREE template, then use our step-by-step guide and use in tandem to complete the health check
2. What data can I get from ecommerce tracking?
With ecommerce tracking enabled in Google Analytics, you’ll be able to see:
- Revenue from product sales
- Average order value
- Total transactions and product purchases
- Number of days/sessions before a transaction occurred
- Sales performance on particular dates
Ecommerce tracking can also include the product category to analyse product performance in groups. This all combines to give you lots of useful business data that you can segment by marketing channel and user behaviour.
“Where are ecommerce reports located?”

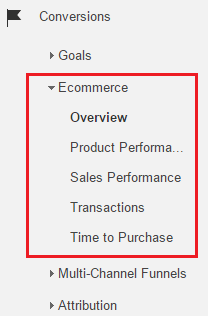
Ecommerce reports are located in the reporting view in the Conversions category of the main left navigation. If ecommerce is not enabled in your Google Analytics settings, this report will show an error message.
3. How to implement ecommerce tracking
Ecommerce tracking is an official plugin for Google Analytics that provides a method for measuring transactions and product performance.
Implementing ecommerce tracking will involve code changes to your website and changes to your Google Analytics settings.
Step 1: How to enable ecommerce in Google Analytics
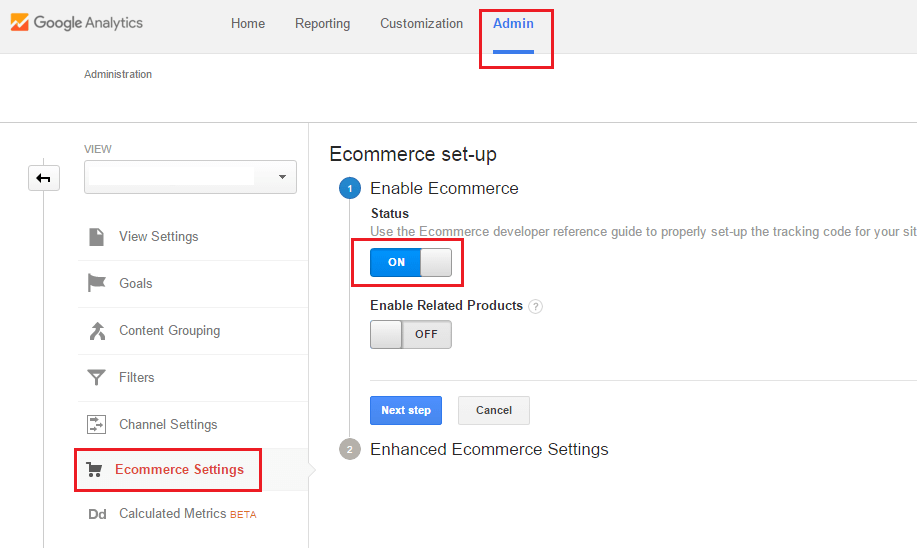
Ecommerce is enabled in the Admin area of Google Analytics. Click ‘Ecommerce settings’ under the view for which you wish to enable ecommerce. Then, click the ‘Enable Ecommerce’ button to ‘ON’.

Step 2: Website code changes
On a standard ecommerce site, these code changes should be made to the confirmation page, which is displayed after a successful transaction has been made.
These code changes include:
- Enabling the ecommerce plugin
- Creating a transaction
- Adding each product in the user’s transaction as an item
- Sending the transaction to Google Analytics
Enabling the ecommerce plugin
The following code enables the ecommerce plugin:
ga('require', 'ecommerce');
Plugins should be enabled after the creation of the Google Analytics tracker but before any specific ecommerce functionality. A full code example is included at the end of this section of the post.
Creating a transaction
Key point: All transaction and product data should be populated using the server data. The ecommerce data should be dynamically added to the final page as JavaScript. Avoid ‘pulling’ the data from HTML elements after the confirmation page has been loaded.
The following code will create a transaction:
ga('ecommerce:addTransaction', { 'id': '1234', // Transaction ID. Required. 'affiliation': 'Fresh Egg', // Affiliation or store name. 'revenue': '43.66', // Grand Total. 'shipping': '3', // Shipping. 'tax': '1.29' // Tax. });
Key point: In the code, revenue should be the total without the shipping and tax. Google Analytics will calculate total revenue displayed in reports as Revenue = Product Revenue + Tax + Shipping.
Adding items to the transaction
For each item in the basket, the server side logic should loop through each product and output the following code:
ga('ecommerce:addItem', { 'id': '1234', // Transaction ID. Required. 'name': 'Fresh Egg', // Product name. Required. 'sku': 'AB12345', // SKU/code. 'category': 'Blue eggs', // Category or variation. 'price': '22.33', // Unit price. 'quantity': '1' // Quantity. });
Key point: Do not send any personally identifiable information (PII), such as the customer name or address, to Google Analytics. This is against Google Analytics’ terms and conditions and may result in your account being removed.
Sending the data to Google Analytics
Once the transaction and item code has populated, send the data to Google Analytics using the following command:
ga('ecommerce:send');
And that is everything required for a standard ecommerce set up.
Here is what the full JavaScript code looks like, alongside a Google Analytics page view:
<script> (function(i,s,o,g,r,a,m){i['GoogleAnalyticsObject']=r;i[r]=i[r]||function(){ (i[r].q=i[r].q||[]).push(arguments)},i[r].l=1*new Date();a=s.createElement(o), m=s.getElementsByTagName(o)[0];a.async=1;a.src=g;m.parentNode.insertBefore(a,m) })(window,document,'script','https://www.google-analytics.com/analytics.js','ga');
ga('create', 'UA-XXXXXXX-1', 'auto'); ga('send', 'pageview');
ga('require', 'ecommerce');
ga('ecommerce:addTransaction', { 'id': '1234', // Transaction ID. Required. 'affiliation': 'Fresh Egg', // Affiliation or store name. 'revenue': '43.66', // Grand Total. 'shipping': '3', // Shipping. 'tax': '1.29' // Tax. });
ga('ecommerce:addItem', { 'id': '1234', // Transaction ID. Required. 'name': 'Fresh Egg', // Product name. Required. 'sku': 'AB12345', // SKU/code. 'category': 'Blue eggs', // Category or variation. 'price': '22.33', // Unit price. 'quantity': '1' // Quantity. });
ga('ecommerce:addItem', { 'id': '1235', // Transaction ID. Required. 'name': 'Analytics team', // Product name. Required. 'sku': 'AB12345', // SKU/code. 'category': 'Services', // Category or variation. 'price': '21.33', // Unit price. 'quantity': '1' // Quantity.});
ga('ecommerce:send');
</script>
4. How to test the ecommerce tracking code
Google Analytics sends data through HTTP requests so Google Developer Tools can be used to check these requests.
Hits for Universal Analytics start with the URL path ‘collect?...’. There should be a collect hit for each item and a hit for the transaction. The ‘t’ value in the query string parameters will provide the type of hit: transaction or item.
5. Common ecommerce tracking problems and solutions
Referral issues caused by payment providers like PayPal.
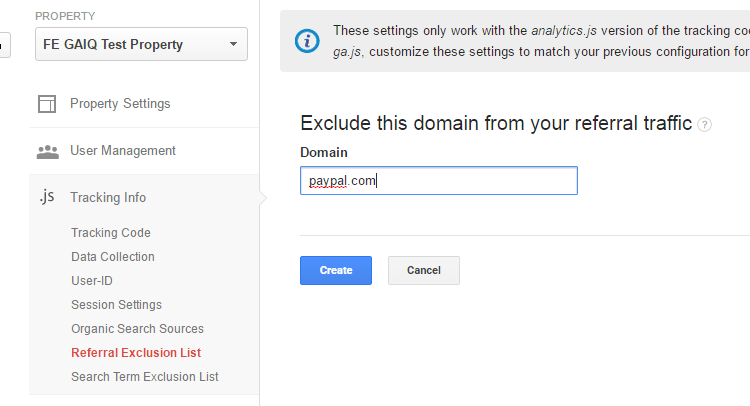
If you can see paypal.com or other payment providers in your referral report (Acquisition > All Traffic > Referrals), those transactions will no longer be attributed to the original traffic channel, e.g. organic or Facebook campaigns.
Fix this by adding them to the referral exclusion list in the Property settings:

Users refreshing confirmation pages can cause duplicate transactions.
Fix this by setting a flag in the database table. The flag should be set when the user first sees the confirmation page. The GA transaction code should be hidden when the flag is set to true, in order to prevent page refreshes causing duplicate transactions.
Internal traffic from development testing often causes inflated transaction revenue.
To fix this problem, ensure your internal IP addresses are filtered in Google Analytics. If you aren’t sure about the integrity of your Google Analytics setup, then contact our analytics team to arrange a health check.
Not escaping product names and categories can cause tracking problems for certain products.
Ensure the JavaScript syntax does not break for certain products by escaping special characters, like quotation marks, with a \’ backslash.
Read our blog post – 8 common problems with ecommerce tracking in Google Analytics – to learn how to fix other common issues.
Need help?
Our analytics experts can help you set up eCommerce tracking and help you analyse your eCommerce performance. Contact us, and one of our team will be happy to help.
Do you have a Google Analytics challenge we can help you with?
Related reading
Do you have a challenge we can help you with?
Let's have a chat about it! Call us on 01903 285900