Content Grouping in Google Analytics - What You Need to Know
By Intern |14 Mar 2014
![]()
Have you ever wanted to analyse your website pages together instead of individually, without having to create advanced segments?
Do you want to be able to analyse data from your website in the same way you have your navigation structured?
Do you want to know which products or departments are performing the best on your website?
If the answer is yes, then the new ‘content grouping’ feature available in Google Analytics (GA) is just what you need.
As a Google Analytics Certified Partner, we have been playing around with the new content groupings feature for a little while now.
Here is what you need to know about GA content grouping
You create content groupings at view level in order to group certain pages and/or app content together in a way that will replicate how you see your website.
Content groups can be created in three ways within GA:
- Group by tracking code – Extra code is added to the Google Analytics Tracking Code (GATC)
- Group using extraction method – Use regex capture group to extract content by URL, page title, or content description value
- Group using rules – Define which page would belong to a group by using defined rules
There is a maximum of five content groups for each view within a property.
How to set up content groups - step-by-step video
The video below shows the step-by-step process for setting up content groupings using the rule definitions method (find more information below). In it, we set up a content group that includes all of our 'services' pages - for example 'www.freshegg.co.uk/analytics', 'www.freshegg.co.uk/social-media' etc.
For more detailed instructions, read the written step-by-step guide below the video.
How do I set up content groups in Google Analytics?
In order to create content groups on your site, you will need to go to the admin section in GA and find ‘Content Grouping’ in the ‘View’ section.

Click on ‘Content Grouping’, and then select ‘Create New Content Grouping’. You will then be presented with following interface and the three options to set up content groups.
You will need to give your grouping a name and then choose which method you wish to use to create your grouping. It is possible to use all three options if you want or need to create very complex content groupings.
If you do not want to make changes to your tracking code, then you should assign your content groups via the extraction or rule methods.
1. Group by tracking code
This method requires modifying the tracking code on each page you want to include in a group. The code will set the name of the content group when the page/screen renders.
The code for a content group is similar to the code for a custom dimension. You can set five content groups using the tracking code and each group will need to use a number (1-5) to identify it.
You will also need to specify a group name in order to identify your group.
![]()
Each _setPageGroup can only be indexed with one number.
You will need to use multiple calls on one page in order to group the page into multiple groups. For example:
_gaq.push([‘setPageGroup’, 1, ‘Dresses’ ]);
_gaq.push([‘setPageGroup’, 2, ‘SummerDresses’ ]);
This is the best method to use if your URLs are not easily distinguishable, for example if you use content ID numbers.
Please note this is not yet available in Google Tag Manager and will require IT involvement to set it up.
2. Group using extraction
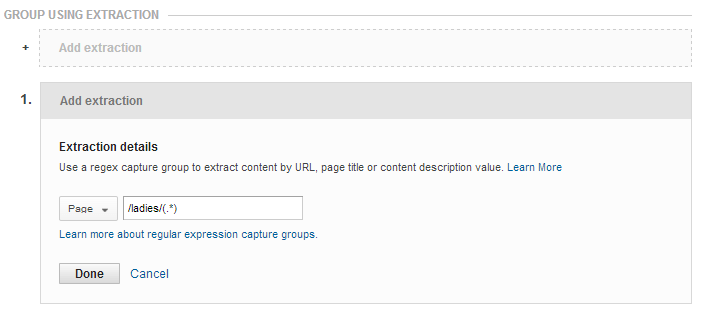
Grouping content via extraction allows you to automatically define a number of groups. It works by extracting the name of your content group from an existing dimension of data. It is a very fast and powerful way to create content groupings.
Using regex to capture the URL, page title or screen name, you can create content groups for each subdirectory you specify, while adding each page in the subdirectory to its corresponding content group.

The above will create a content group for each subdirectory of /ladies/, and add the pages in each subdirectory to the corresponding content group.
While the extraction method is extremely flexible, it is worth noting that your regex patterns may need updating when you add new content to your site or app.
3. Group using rule definitions
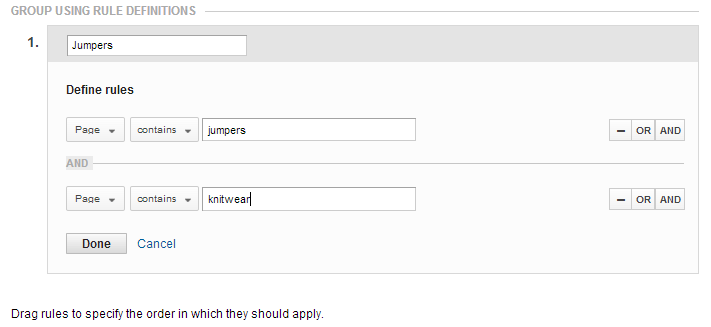
The rules method is similar to the extraction method; the main differences are that you do not need to know regex and that you will have to manually name the group. You can create rules based on different dimensions of data (page, URL, screen name). If the dimension matches the rule, the content will be added to the group you created.
For each rule:
- Enter the name you want to use for the content group (for example, Jumpers)
- Under ‘Define rules’, select a matching option and enter the value you want to match (for example, page, URL, page title, screen name)
- Rules can have multiple conditions such as ‘contains this’ or ‘contains that’, for example:
page > contains >/jumpers/ OR page > contains /knitwear/ - Click ‘OR’ or ‘AND’ to add additional conditions to your rule if you wish
- Once you have defined all your conditions, click Done
- After you have configured your group, click Save

Once you have created all your rules, you can re-order them by dragging and dropping them into the correct order.
Why should you use content groups?
By creating these groupings, you will be able to analyse how different products, or categories of products, work together. You will be able to see which sections of your site are performing well, and be able to compare and analyse groups of pages against each other – for example, departments, product lines, brands etc. – instead of doing a comparison via URL or page title alone.
Once created, you can view and compare the aggregated metrics of a group: page views, unique page views (NB: uniques are for people who viewed the group, not the page), average time on page, etc., while still having the ability to drill down to an individual URL or page title. Your content groups are available in the All Pages and Landing Pages content reports as a primary dimension. You will see the content grouping dimension selector as highlighted below. Simply click the drop down and select the content group you wish to use.

Pages that are not included in a group will appear as (not set) in the content grouping reports.
Other important information about content groupings
There are a number of key considerations to make when using content groupings:
- While it is possible to use all three methods for creating groups, you must remember that grouping logic is applied sequentially. So, the tracking code method will be applied first, followed by the extraction method, and then finally the rules method will be applied
- Content groups are not applied to historical data – they are only applied from the date that you create them
- Once created, it takes around 24 hours for data to populate in the reports
If you need any further help with this, or any other Google Analytics features, please get in touch with us or check out our analytics training courses
Alternatively, if you'd like to read more, take a look at our other related blog posts and downloadable resources:
- How to set up e-commerce tracking in Google Analytics
- How to track your digital marketing campaigns in Google Analytics
- Free downloadable resource: Campaign tagging for Google Analytics cheatsheet