
6 Steps to Creating a Content Marketing and Social Plan and Why You Need One
By Intern |5 Nov 2015
Putting it simply, a content marketing plan is a document that allows you to see and understand the content that is planned for your website. It answers the big five ‘W’s all journalists swear by, so for your content marketing:
- Who – not only who will be creating the content but also who it will be created for
- What – what format the content will take and what it will include
- Where – where the content will be published
- When – when the content will be published
- Why – why the content is being created in the first place; what it is intended to achieve
A content marketing and social planner is essential to help you plan out the successful research, creation, publication, promotion and refinement of effective content. It is designed to take an existing content strategy and translate it into a detailed plan that co-ordinates all aspects of your content marketing activity.
Why do you need a content marketing and social planner?
Whether you are creating a series of new onsite guides or are looking to better plan your blog content, a content marketing planner is designed to help you plan and keep track of the key elements of each piece of content.
It provides you with the simple framework needed to ensure your content is always geared towards answering your audience’s questions, and achieving your website’s and business’ objectives.
Knowing where to start when creating a content marketing plan can be tricky. That’s why we’ve created a free downloadable content marketing planner template for you to use for your own website.
Click the link at the bottom of this post to download.
How to create and fill in the content marketing and social planner template
The template is just the starting point – actually filling it out is where the hard work comes in. Before you begin, there are a few things to note about the planner:
- It is designed to cater for all types of content – from regular blog articles to more involved onsite content such as content hubs . This means that some columns might not be appropriate for your particular project or strategy – the template is designed to be a starting point; it’s important that you edit it so it best suits your own way of working
- Use the content marketing planner in conjunction with a publication checklist – like our ultimate blogging best practice checklist – for a thorough editing process
So, with all that in mind, where do you begin with populating your content marketing and social planner?
Step 1: Sort out your admin
As you might expect, it all starts with a spreadsheet. Create and setup your planner in a programme like Excel – or Google Sheets if multiple people will be accessing and editing the planner at the same time.
Don’t forget you can download our free template at the bottom of this post to make this part nice and easy!
Plot your timeline in the first column and include rows for relevant public events and staff holidays. The top row will include the headings that we’ll talk through in more detail throughout this post.
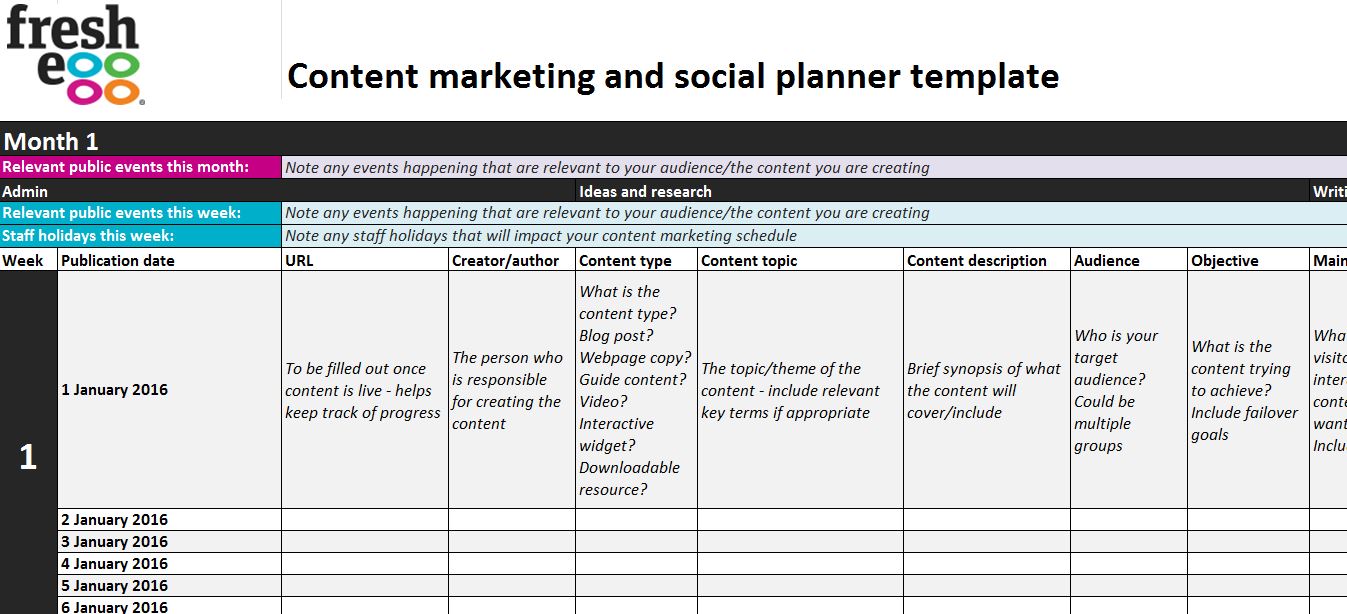
Publication date
- Include the date that the content is planned to go live
- This means everyone involved in content creation knows what deadline they are working towards
- You may also choose to add additional columns – ‘Scheduled publication date’ and ‘Actual publication date’. These can be useful to keep track of any missed deadlines
Relevant public events
- These should be intrinsically relevant to your target audience and offering. This will ensure you are capitalising on relevant events and not wasting time and effort shoehorning in content
Staff holidays
- Keep track of staff holidays that will impact your content marketing schedule
- This will allow you to plan for any periods of absence and prevent your deadlines from being missed
URL
- Once the content is live, include its published URL in the planner. This helps you keep track of progress
Creator/author
- Keep a note of the one person who is ultimately responsible for the content going live
- Including only one person in this column makes it easier to know who to speak to if you have any questions
Step 2: Ideas and research
The next step for filling in your planner is the ideas and research section. This covers off what exactly will be published, why and who for.
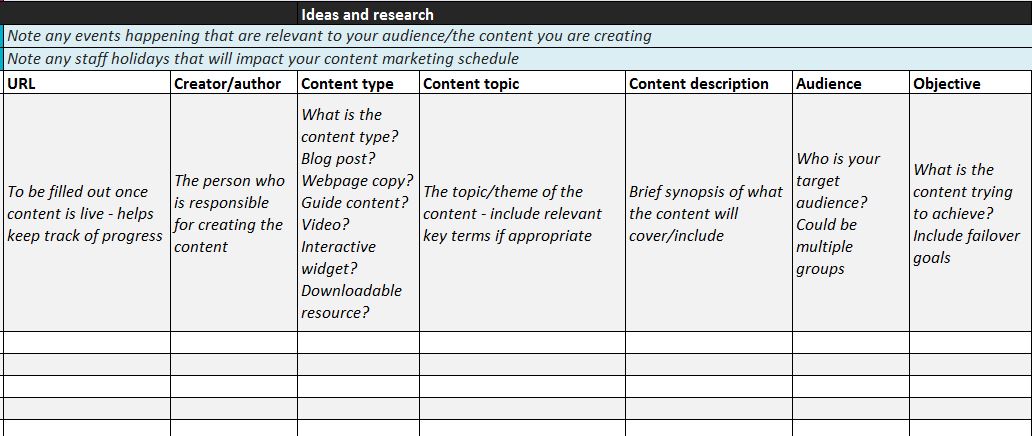
Content type
- Note down the type of content that is being created – this could be anything from a blog post to an interactive widget
- Remember: The type of content you’re creating should be appropriate for the topic you’re covering and the audience you’re targeting. There are numerous ways you can research this – enough for a blog post in itself – but as a starting point, you can use your own Google Analytics data to see what types of content have performed well for you in the past, and analyse popular competitor content for more ideas
Content topic
- Note the topic that your content will be covering
- Include relevant key terms, if appropriate, to ensure you’re covering the topic thoroughly and providing information that is useful to your target audience
- Use tools such as Searchintent.co.uk and Google’s Keyword Planner to investigate related topic areas that could be covered
Content description
- If you need to provide a little more context as to what the content will include or look like, use this column to do just that
- Remember that this planner isn’t designed to replace a full brief but just to give enough information so you – and your team – have a handle on what the blog post will entail
Audience
- Make it clear which of your identified audiences your content will be targeting
- Use this column to explain whether it’s a specific audience persona, existing or potential customers, pre- or post-purchase customers, a particular demographic – the list goes on
- It could be that the content will be tailored to engage with more than one audience – include any that are relevant and prioritise if necessary
Objective
- Stipulate exactly what it is you are attempting to achieve with your piece of content
- This could be related to a wider business or digital marketing goal, such as getting more sales, or to a more specific campaign objective, such as winning more newsletter subscribers
- It’s fine to be broad here – specific measurable metrics will be covered later in the planner – but ensure you are clear in what you are trying to achieve
Step 3: Writing, formatting, images and rich media
So that’s the ‘who’, ‘where’, ‘when’, ‘why’ and some of the ‘what’ covered – but what shape is the content actually going to take? Most of this will be taken care of by a full brief but there are a few items to cover off in your planner to make sure everyone’s on the same page.
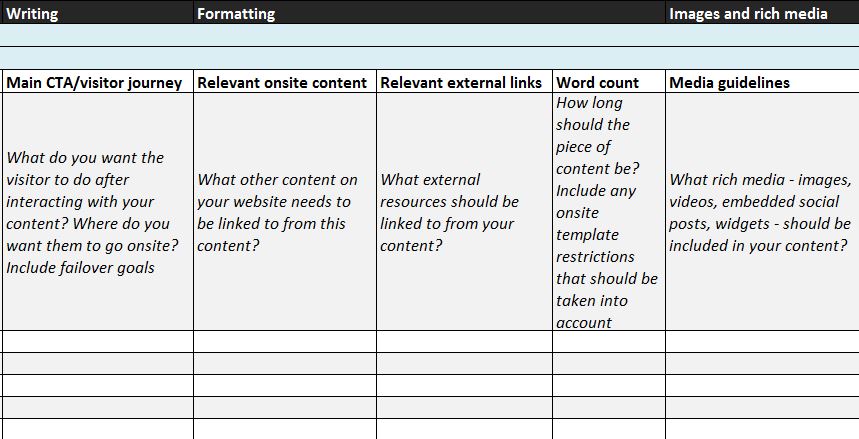
Main CTA/visitor journey
- Write the main call to action (CTA) that is set to be featured in your content here. Think about what it is that you want the user to do after they have interacted with your content. For example, making an enquiry, purchasing a product, visiting another page on your website, or subscribing to your newsletter
- Ensure you’ve considered failover goals as well – if you can’t convince the user to carry out your main CTA, what else would count as a win for your site or business? Find out more about this in the blog post from our digital marketing director, Lee Colbran: How to Track and Measure Page Performance in the New World Order of SEO
Relevant onsite content
- List the different pieces of onsite content that need to be linked to from your new piece of content
- This could be relevant product pages, relevant existing blog posts or guides – anything that is going to help keep the user engaged with your site and business
Relevant external links
- List any external resources that need to be linked to from your new piece of content
- External links may not always be relevant but if there is an existing relevant resource out there on the web that’s from a reputable source, include it
- When deciding whether to include an external link, ask yourself: ‘Would the user expect to see this source referenced and will they find the information useful?’
Word count
- Stipulate a word count if necessary and relevant
- If you’re creating a video, a time limit might be more useful here
- Consider any onsite template restrictions that might impact this
Images and rich media
- Summarise what images or other forms of rich media – videos, embedded social posts, widgets etc. – are to be included in your content. This could take the form of a brief summary of rich media yet to be sourced, or specific links to the media that will be embedded or uploaded
Step 4: Amplification
When creating any content, there should always be a plan as to how you’re going to get that content in front of your target audience – how you’re going to promote it.
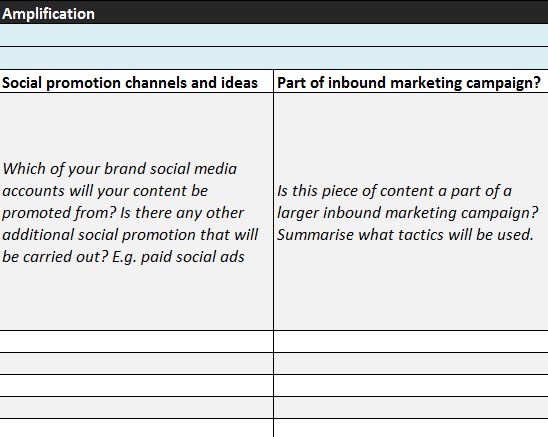
Social promotion channels and ideas
-
List which of your brand social media accounts will be used to promote your content, including any paid social advertising that will be carried out
-
Adding an additional ‘social promotion’ tab to your content marketing and social planner makes it easier to keep track of the specifics – particular messages for particular platforms, what is to be posted where and when, etc.
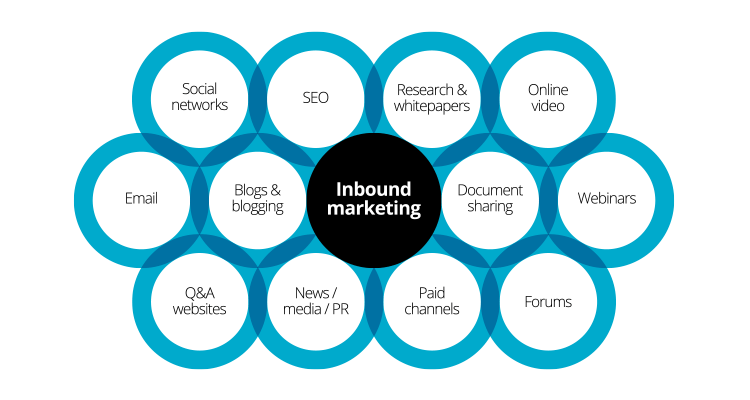
Part of inbound marketing campaign?
-
If your piece of content is part of a larger inbound marketing campaign, use this column to note down the tactics that are being used as part of the campaign
-
This will give you and your team an ‘at-a-glance’ understanding of the wider context of the piece of content, if there is any
-
If your content is part of a larger inbound marketing campaign, you’ll likely need a separate campaign planner to keep track of all of the different elements of the campaign and their progress
Step 5: Measurement
In order to prove whether your content marketing is a success, you need to measure its performance. By actively measuring and reporting on the performance of content, a continual process of learning and refinement is enabled. You can learn what works well – and what doesn’t – and feed those results back into your content strategy.
Before creating the content in the first place, you need to know what that measurement is actually going to look like.
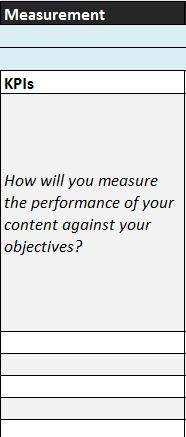
KPIs
-
Note down the specific key performance indicators (KPIs) that are relevant to your piece of content
-
Be specific – use defined metrics to specify how you are going to measure success
-
Use numerical figures and benchmarks to really demonstrate value – for example, if you’re aiming to attract referral traffic, how much do you expect to attract over what time period?
-
If possible, use the performance of existing similar content to help you set sensible targets
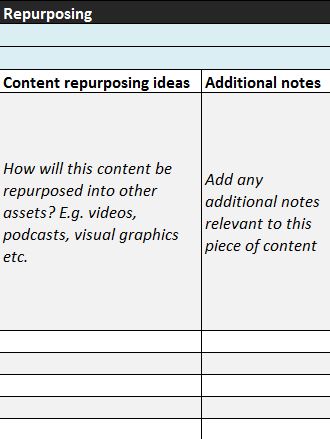
Step 6: Repurposing
Efficient content marketing is all about making the most of your existing assets. Thinking about how you can reuse the content you’re creating from the outset saves you time in the long run.
Congratulations – you’ve now completed setting up your content marketing plan!
It can feel like a long-winded process at first, but it soon becomes second nature. Methodically planning out your content marketing and social media activity provides better results and improves efficiencies in the long run.
Want to create your own content marketing and social plan? Download our content marketing and social plan template for free.
If you need support creating and implementing your own content marketing and social planner, we can help. Fresh Egg offers a wide range of content marketing services.
Get in touch to find out more about how we can help you implement an effective content marketing strategy.